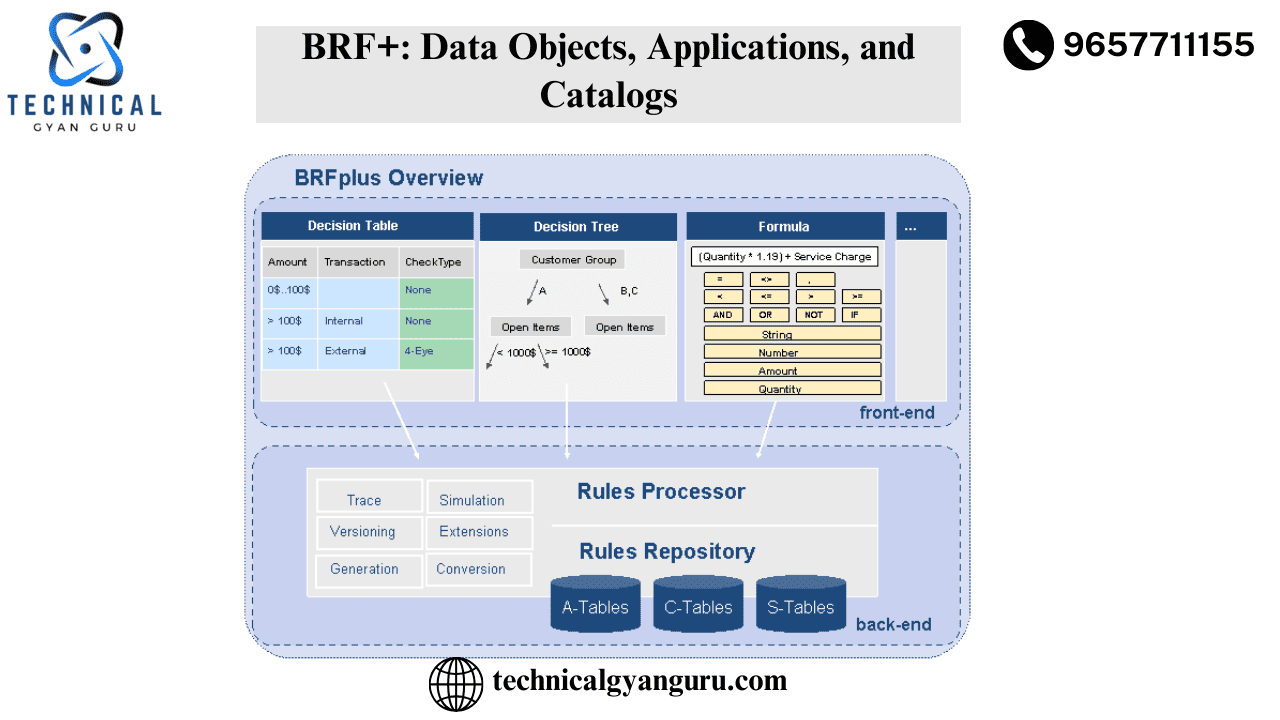
we began our BRF+ series. You will learn about BRF+ inventory, application, and data object generation ideas through this blog. Make sure you click the aforementioned link before continuing to read this article. Even if you thought the prior article was too technical, you should still read this one to gain a better understanding of BRP+ and apply it to the design of your actual project application.
With the aid of actual user case scenarios, which will involve a number of decisions made using BRF+, we will delve deeply into the creative processes, insider tips, and technical features of each BRP+ object from this blog (on Catalogs, Applications, and Data Objects) and future posts.
We’ll look at how a credit card issuer establishes the upper limit on a freshly issued card and how it affects and raises the total limit on other cards that are already in circulation. The customer service representative (CSR) can offer the concerned credit card applicant the maximum credit limit with the assistance of the BRF+’s insight.
We prefer software to be able to know and predict the result based on some input, rather than being a total Black Box. We are aware that every software adheres to the GIGO (Garbage In Garbage Out) procedure, but if we understand the behavior of the software, we can enter clean data rather than trash. Before you get your hands dirty, it is imperative to predict with a reasonable degree of precision how your BRF+ configuration will behave.
BRF+ consists of 50% build realization effort and 50% design effort. Additionally, we can acquire the right result from BRP+ by properly modeling the system.
We’ll see an example of how BRF+ functions in this post. We are going to generate an Application, a Catalog, and a few data objects for our BRF+ scenario. Should you find all of these terminology unfamiliar, don’t worry—we’ll do our best to interpret and translate them into a language you can comprehend. 🙂
To determine the highest credit limit that can be awarded to an applicant, let’s first review the elements (or, to be more precise, the decisions) that a BRF+ application should consider.

All of these choices can be fulfilled with the right BRF+ objects. The moment has come to learn about the BRF+ Application and Catalog and how to construct them in SAP.
BRF+ Announcement of Training
Please register using the form below to indicate your interest in attending Technicalgyanguru instructor-led online paid training. Our group will respond to you as soon as our training is prepared.
BRF+ Catalog — Visualization and Navigation Help:
BRF+ is the framework that is developed and maintained with the business user subconsciously in mind, as was disclosed in the previous article. Additionally, it is crucial that we maintain the tool’s simplicity, organization, and appropriateness (not less or more) when non-technical parties are involved, such as business users or end users.
Business apps belonging to the same line of business (business teams) should be organized in BRF+ workbench, just like your files are organized in sub-folders and folders. To organize and provide a structured perspective for the collection of BRF+ objects is the primary goal of a BRF+ catalog.
Catalogs do not process relevant data in the same way as other BRF+ objects. This implies that they abstain from the process of making decisions. It is your responsibility as a BRF+ administrator to define catalogues and arrange each application within them according to the business line and the business users who will be utilizing them. Additionally, you may control how much detail a user can see or not. For instance, a business user doesn’t need to know all of the technical data types or variables in a particular BRF+ application. Thus, you can conceal them and offer the user the most basic view obtainable via the BRF+ workbench.
Let’s take a brief look at what an application is before learning how to develop a Catalog View in BRF+.
Application — BRFplus Object Container:
An application is the BRF+ container, if you are familiar with the containers in SAP process. Put differently, an application in BRF+ serves as a container for different objects and BRF+ functions.Generally speaking, a BRF+ application is comparable to a Package in an ABAP system or a Project in an Eclipse development environment.
Why do you need an application if we already have a catalog to group and bundle all the objects? In addition to organizing things for you, an application also contains technical details and characteristics for every BRF+ function that it is associated with.
After enough theoretical discussion, let’s get into the SAP System and conduct some practical BRF+ work.
T-Code: BRFplus or BRF+. Indeed, both are functional.
Change the workbench view to suit your comfort level if you are a functional consultant, technical consultant, or super user (IT user). Navigate to the settings and select Expert View. This will open up a lot of technical and maintenance features that are not available in Simple View.

You will see a settings option at the top of the workbench on your right. Select “Expert” as the user mode, then click “Save.”

Creation of Application:
Application serves as a container for BRF+ Functions and other objects, as was previously indicated. Both of the BRF+ functionalities we want to develop—one for the credit limit for new customers and the other for an increase in credit limit for current customers—will be included in our application. Thus, let’s use MAX_CREDIT_LIMIT as the program name.
There is a “Create Application” button on the panel on the left. Hit it without thinking twice.

Storage Type: There are three different kinds of storage. The planned use of the application objects determines which storage category is chosen. The same storage type will be used for any BRF+ object you create in this application. This implies that a single application will have a single storage type for all of its objects.
Data customization: Used in the development of unique commercial applications. Objects that enable you to modify or create new elements within your system environment are called customizing objects. The FDT_ADMN_0000S and FDT_ADMN_0001S tables are used for objects. The table below shows the different transport types and client dependencies. Class “C” delivery.
Master data: Applied to client-dependent objects that can only be transferred locally by default.
System data: Generally speaking, objects designated as system objects are meant to remain unaltered.Delivery Category “S”
You cannot capture your development in a transport if you check the local application; instead, it will be produced as a local object.

Click the “Activate” button in the toolbar menu once your application has been built. Your application’s status will turn green in the left-hand panel after it has been activated.

Now, after creation of application you can add it to an existing catalog or create a new catalog. Since our end business users are customer service representatives, lets create a catalog named as CUST_SERV_REPS and add application MAX_CREDIT_LIMIT to that.
If you have visited any library, you must have seen the physical catalog book which specifies which book is present in which shelf. Or, if you have worked in SAPUI5/Fiori, there also we use Catalog and Groups. Catalog has the similar usage in BRF+ as well.
Upon right click on the application name, you can see list of menus with option ‘Create’. Choose, Catalog.

Give the mandatory inputs and related texts.

Now Activate your catalog. Once your catalog is activated, right click again on the application and see for the option ‘add to catalog’.

Search for your newly created catalog by technical name and add it.
If you see on the top-left space, you can see where you can switch views, REPOSITORY view and CATALOG View. After addition of your application to catalog, go to repository view and select your catalog to view the application you created. This view of catalogs is intended for Business users.
Based on the roles of business users, in our case Customer Service Representative they can be provisioned.

Now, let us come to actual BRF+ objects which will be part of decision-making and objects that are purposed to be part of logical designs. The heart and brain of our BRF+.
Data Object — Data Carriers:
Data objects are the carriers of the data values in BRF+. In usual ABAP programming practice, you define data type (what type of data it carries, numeric, text, decimal, date etc.,) and then you declare a variable of that data type. In BRF+, the data object serves both purposes of data typing and being a variable.
In simple term, data object is a variable with specific type we define.
There are 3 data objects that BRF+ supports. Elements, structure and tables. You guessed it right. Used for simple variables, many field structures and arrays respectively.
Let us see create them one by one.

While creation of an element, structure or a table you will get options to bind them.
In case of No binding, you must specify what type of data type is intended for the element.
For Binding to DDIC elements, you can specify data type that is existing in your ABAP dictionary (SE11/SE12). You can also create a data element which will be bound to existing BRF+ data element.
For DDIC elements, all the properties like field length, number of characters or numbers, decimal points will be inherited from the element which is linked to that.
For our example, we need a data element to hold the value of credit score of credit card applicant. It is going to be a number with no decimal points.

Press on create and navigate to Object and Activate the element.
You can also create data elements in mass, i.e many at the same time. Check below screenshots.


Activate all the elements and let us add them to structure and then to table.


Click on add existing data objects and select multiple with help of ‘cntrl’ button.

Activate it.
In creation of table, you can directly assign the above created structure in ‘Table Line Type’ (highlighted below). Create and navigate to object -> Activate.

After this exercise, your BRF+ object panel will contain a customer representative Catalog, Application for maximum credit limit and data objects that will hold values for our BRF+ function build in our upcoming posts.

With our stand-ins and pawns set for the real fight, we are prepared.We will learn how to use each item in the BRF+ Function in the upcoming tutorial.I’m an ABAP developer, so all we really defined were the internal tables, structures, and variables.In order to change the data and produce the desired result, we must now retrieve the data and apply the logic. The sole distinction is that we might be able to avoid writing any ABAP logic.One of BRF+’s USPs is that.Without using code, we are able to create intricate decision-making models. Non-technical Business Analysts, Functional Consultants, and End Users can also independently create BRF+ models.
you may be interested in this blog here :-
Oracle database structure diagram
Boosting Customer Service with Salesforce and SharePoint Integration


